Hi,are you interested?
感兴趣么?
请主动联系我们!
博雅数码科技(北京)有限公司
联络地址:北京市丰台区汉威国际广场三区5号楼4层. 电话:010-63733288 办公时间:(GMT+8) Mon - Fri : 9:00AM - 18:00PM填写您的项目信息
Isilon NL 400 实施文档
博雅数码科技(北京)有限公司Isilon NL 400 实施文档
一、实施前准备
1.1 工具准备
配置Isilon需要自己准备一根串口线(9针母对母,2、3交叉线),一根9针串口转USB线。
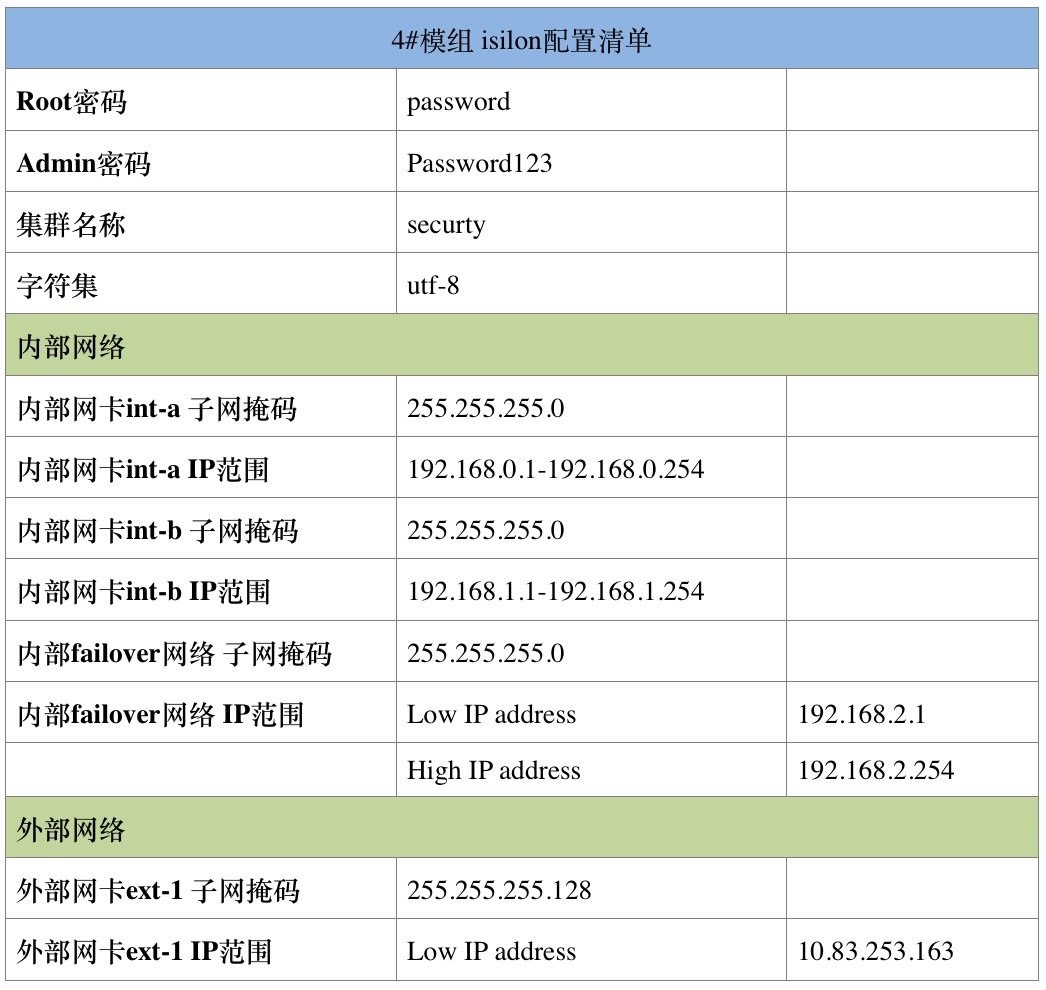
1.2 收集配置相关信息
收集用于配置的相关信息,如:Root密码、Admin密码、公司名称、群集名称、内部IP地址、外部IP地址(每个节点必须配置至少一个外部IP地址和子网掩码)、时区等等。

二、初始化配置
使用串口线连接Isilon,通过SecureCRT(putty等软件)以如下配置访问Isilon:
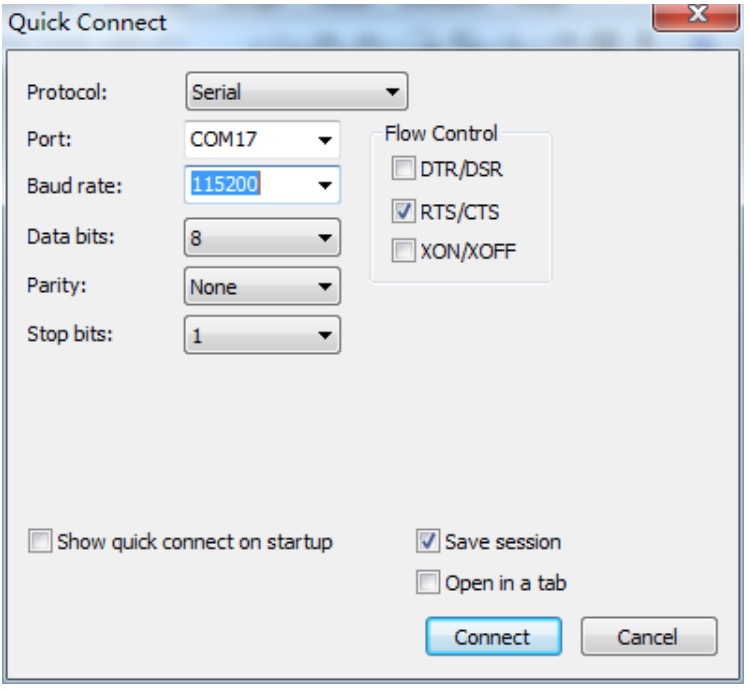
注:其中Port:选项根据管理机的实际情况选择
Please select an option.
Node build: Isilon OneFS v7.0.1.10 B_7_0_1_233(RELEASE)
Node serial number: SN400-231351-0134
Select an option:
[ 1] Create a new cluster
[ 2] Join an existing cluster
[ 3] Exit wizard and configure manually
[ 4] Reboot into SmartLock Compliance mode
Wizard >>> 1 /选择1,开始初始化
Please change the root password from the default. /配置root密码
Please enter new password for root:
Please re-enter password for root:
Password changed.
Please change the UI admin password from the default. /配置admin密码
Please enter new password for admin:
Please re-enter password for admin:
Password changed.
Would you like to enable SupportIQ? [yes] y /配置SupportIO,如果不需要可以不配置
Edit contact information (RETURN to keep current setting):
Please enter company name (): baidu
Please enter contact name (): liuxing
Please enter contact phone (): 15901281728
Please enter contact email (): liuxing02@baidu.com
Enter a new name for the cluster: /配置Isilon集群名称
Configure name >>> securty
Cluster name set to securty
Cluster encoding: /配置字符集UTF-8
[ 1] Windows-SJIS
[ 2] Windows-949
[ 3] Windows-1252
[ 4] EUC-KR
[ 5] EUC-JP
[ 6] EUC-JP-MS
[ 7] UTF-8-MAC
[ 8] UTF-8
[ 9] ISO-8859-1 (Latin-1)
[10] ISO-8859-2 (Latin-2)
[11] ISO-8859-3 (Latin-3)
[12] ISO-8859-4 (Latin-4)
[13] ISO-8859-5 (Cyrillic)
[14] ISO-8859-6 (Arabic)
[15] ISO-8859-7 (Greek)
[16] ISO-8859-8 (Hebrew)
[17] ISO-8859-9 (Latin-5)
[18] ISO-8859-10 (Latin-6)
[19] ISO-8859-13 (Latin-7)
[20] ISO-8859-14 (Latin-8)
[21] ISO-8859-15 (Latin-9)
[22] ISO-8859-16 (Latin-10)
[Enter] Use current encoding: utf-8
Configure encoding >>> 8
Encoding set to utf-8
Configure interface int-a:/配置内部网卡a
[ 1] Configure netmask
[ 2] Configure int-a IP ranges
[Enter] Keep the current configuration:
Netmask: (not set)
IP ranges: (not set)
Configure interface int-a >>> 1
Enter a new netmask
Configure int-a netmask >>> 255.255.255.0
Configure interface int-a:
[ 1] Configure netmask
[ 2] Configure int-a IP ranges
[Enter] Keep the current configuration:
Netmask: 255.255.255.0
IP ranges: (not set)
Configure interface int-a >>> 2
Configure int-a IP ranges
[ 1] Add an IP range
[ 2] Delete an IP range
[Enter] Keep the current IP ranges:
IP ranges: (not set)
Configure int-a IP ranges >>> 1
Enter the low IP address of the range to add:
Low IP address (add) >>> 192.168.0.1
Enter the high IP address of the range:
High IP address (add) >>> 192.168.0.254
Configure int-a IP ranges
[ 1] Add an IP range
[ 2] Delete an IP range
[Enter] Keep the current IP ranges:
IP ranges: 192.168.0.1-192.168.0.254
Configure int-a IP ranges >>>
Configure interface int-a:
[ 1] Configure netmask
[ 2] Configure int-a IP ranges
[Enter] Keep the current configuration:
Netmask: 255.255.255.0
IP ranges: 192.168.0.1-192.168.0.254
Configure interface int-a >>>
Select the internal interfaces to configure /配置内部网卡b
[ 1] int-a - primary internal interface
[ 2] int-b - secondary internal interface (failover)
[Enter] Exit configuring internal interfaces
Configure internal interfaces >>> 2
Configure interface int-b (failover):
[ 1] Configure netmask
[ 2] Configure int-b IP ranges
[ 3] Configure failover IP ranges
[Enter] Keep the current configuration:
Netmask: (not set)
IP ranges: (not set)
Failover IP ranges: (not set)
Failover: disabled
Configure interface int-b (failover) >>> 1
Type a new netmask
Configure int-b netmask >>> 255.255.255.0
Configure interface int-b (failover):
[ 1] Configure netmask
[ 2] Configure int-b IP ranges
[ 3] Configure failover IP ranges
[Enter] Keep the current configuration:
Netmask: 255.255.255.0
IP ranges: (not set)
Failover IP ranges: (not set)
Failover: disabled
Configure interface int-b (failover) >>> 2
Configure int-b IP ranges
[ 1] Add an IP range
[ 2] Delete an IP range
[Enter] Keep the current IP ranges:
IP ranges: (not set)
Configure int-b IP ranges >>> 1
Enter the low IP address of the range to add:
Low IP address (add) >>> 192.168.1.1
Enter the high IP address of the range:
High IP address (add) >>> 192.168.1.254
Configure int-b IP ranges
[ 1] Add an IP range
[ 2] Delete an IP range
[Enter] Keep the current IP ranges:
IP ranges: 192.168.1.1-192.168.1.254
Configure int-b IP ranges >>>
Configure interface int-b (failover):
[ 1] Configure netmask
[ 2] Configure int-b IP ranges
[ 3] Configure failover IP ranges
[Enter] Keep the current configuration:
Netmask: 255.255.255.0
IP ranges: 192.168.1.1-192.168.1.254
Failover IP ranges: (not set)
Failover: disabled
Configure interface int-b (failover) >>> 3
Configure failover IP ranges
[ 1] Add an IP range
[ 2] Delete an IP range
[Enter] Keep the current IP ranges:
Failover IP ranges: (not set)
Configure failover IP ranges >>> 1
Enter the low IP address of the range to add:
Low IP address (add) >>> 192.168.2.1
Enter the high IP address of the range:
High IP address (add) >>> 192.168.2.254
Configure failover IP ranges
[ 1] Add an IP range
[ 2] Delete an IP range
[Enter] Keep the current IP ranges:
Failover IP ranges: 192.168.2.1-192.168.2.254
Configure failover IP ranges >>>
Configure interface int-b (failover):
[ 1] Configure netmask
[ 2] Configure int-b IP ranges
[ 3] Configure failover IP ranges
[ 4] Disable failover
[Enter] Keep the current configuration:
Netmask: 255.255.255.0
IP ranges: 192.168.1.1-192.168.1.254
Failover IP ranges: 192.168.2.1-192.168.2.254
Failover: enabled
Configure interface int-b (failover) >>>
Select the internal interfaces to configure
[ 1] int-a - primary internal interface
[ 2] int-b - secondary internal interface (failover)
[Enter] Exit configuring internal interfaces
Configure internal interfaces >>>
/配置外部网卡设置外部IP Pool,各个节点会从该Pool中顺序取得外部通讯IP,该IP可供管理和数据通讯共同使用,请勿将计划的SmartConnect IP包括在Pool中
Configure external subnet
[ 1] ext-1 - External interface
[Enter] Exit configuring external network.
Configure external subnet >>> 1
Configure interface ext-1:
[ 1] Configure netmask
[ 2] Configure MTU
[ 3] Configure ext-1 IP ranges
[Enter] Keep the current configuration:
Netmask: (not set)
MTU: 1500
IP ranges: (not set)
Configure interface ext-1 >>> 1
Enter a new netmask
Configure ext-1 netmask >>> 255.255.255.128
Configure interface ext-1:
[ 1] Configure netmask
[ 2] Configure MTU
[ 3] Configure ext-1 IP ranges
[Enter] Keep the current configuration:
Netmask: 255.255.255.128
MTU: 1500
IP ranges: (not set)
Configure interface ext-1 >>> 3
Configure external IP ranges
[ 1] Add an IP range
[ 2] Delete an IP range
[Enter] Keep the current IP ranges:
IP ranges: (not set)
Configure ext-1 IP ranges >>> 1
Enter the low IP address of the range to add:
Low IP address (add) >>> 10.83.253.163
Enter the high IP address of the range:
High IP address (add) >>> 10.83.253.178
Configure external IP ranges
[ 1] Add an IP range
[ 2] Delete an IP range
[Enter] Keep the current IP ranges:
IP ranges: 10.83.253.163-10.83.253.178
Configure ext-1 IP ranges >>>
Configure interface ext-1:
[ 1] Configure netmask
[ 2] Configure MTU
[ 3] Configure ext-1 IP ranges
[Enter] Keep the current configuration:
Netmask: 255.255.255.128
MTU: 1500
IP ranges: 10.83.253.163-10.83.253.178
Configure interface ext-1 >>>
Enter default gateway: /配置网关
Configure default gateway >>> 10.83.253.191
Configure SmartConnect settings /配置SmartConnect,也可以不配置
[ 1] SmartConnect zone name
[ 2] SmartConnect service IP
[Enter] Keep the current SmartConnect settings:
SmartConnect zone name: (not set)
SmartConnect service IP: (not set)
Configure SmartConnect settings >>> 1
Enter SmartConnect zone name
SmartConnect zone name >>> service.securty.com
Configure SmartConnect settings /配置SmartConnect IP,该IP在各节点之间浮动,使用该IP总是访问当前主节点
[ 1] SmartConnect zone name
[ 2] SmartConnect service IP
[Enter] Keep the current SmartConnect settings:
SmartConnect zone name: service.securty.com
SmartConnect service IP: (not set)
Configure SmartConnect settings >>>
Configure DNS settings /配置DNS,可以不配置
[ 1] DNS servers
[ 2] Search domains
[Enter] Keep current DNS settings:
DNS servers: (not set)
Search domains: (not set)
Configure DNS settings >>>
Configure external subnet
[ 1] ext-1 - External interface
[Enter] Exit configuring external network.
Configure external subnet >>>
Configure cluster date and time /配置时区、时间
[ 1] Configure time zone
[ 2] Configure day and time
[Enter] Keep the current date and time: 2014/08/08 12:52:34 UTC.
Configure date >>> 1
Configure cluster time zone
[ 1] Greenwich Mean Time
[ 2] Eastern Time Zone
[ 3] Central Time Zone
[ 4] Mountain Time Zone
[ 5] Pacific Time Zone
[ 6] Arizona
[ 7] Alaska
[ 8] Hawaii
[ 9] Japan
[10] Advanced
[Enter] Keep current time zone: Greenwich Mean Time
Configure time zone >>> 2
Eastern Time Zone
Configure cluster date and time
[ 1] Configure time zone
[ 2] Configure day and time
[Enter] Keep the current date and time: 2014/08/08 08:53:50 EDT.
Configure date >>> 2
Type new date and time values
or press [Enter] to keep the current date and time: 2014/08/08 08:54:17 EDT.
Configure time >>> 2014/08/08 13:59:40
Configure cluster date and time
[ 1] Configure time zone
[ 2] Configure day and time
[Enter] Keep the current date and time: 2014/08/08 13:59:40 EDT.
Configure date >>>
Configure cluster join mode /配置集群加入模式
[ 1] Manual
[ 2] Secure
[Enter] Keep the current join mode: Manual
Configure join mode >>> 1
Join mode set to Manual.
You have made the following configuration changes:
Cluster name : (not set) -> securty
Encoding : (not set) -> utf-8
int-a : enabled -> enabled
int-a netmask : (not set) -> 255.255.255.0
int-a IP ranges : (not set) -> { 192.168.0.1-192.168.0.254 }
int-b : disabled -> enabled
int-b netmask : (not set) -> 255.255.255.0
int-b IP ranges : (not set) -> { 192.168.1.1-192.168.1.254 }
lpbk : disabled -> enabled
lpbk netmask : (not set) -> 255.255.255.0
lpbk IP ranges : (not set) -> { 192.168.2.1-192.168.2.254 }
ext-1 netmask : (not set) -> 255.255.255.128
ext-1 IP range : (not set) -> { 10.83.253.163-10.83.253.178 }
ext-1 gateway : (not set) -> 10.83.253.191
SmartConnect zone name: (not set) -> service.securty.com
Time zone : Greenwich Mean Time -> Eastern Time Zone
Current date/time : 2014/08/08 12:55:03 GMT -> 2014/08/08 14:00:11 EDT
Do you wish to commit these changes? [yes] /选择yes,保存配置,选择no,修改配置
Commit changes? >>> yes
No matching processes were found
Stopping syslogd.
Starting syslogd.
Pre-IFS daemons: isi_watchdog_d isi_hangdump isi_eth_mixer_d isi_flexnet_d.
Starting MCP Daemon: Mounting NFS file systems:.
isi_mcp
.
Initial amd64 initialization:.
Updating motd
Mounting IFS filesystem...
Additional ABI support:.
.
s
t() set the dispatch table
Clearing /tmp (X related).
Starting local daemons:.
Configuring syscons:.
-->/dev/da36s1e
-->/dev/da35s1e
-->/dev/da34s1e
-->/dev/da33s1e
-->/dev/da32s1e
-->/dev/da31s1e
-->/dev/da30s1e
-->/dev/da29s1e
-->/dev/da28s1e
-->/dev/da27s1e
-->/dev/da26s1e
-->/dev/da25s1e
-->/dev/da24s1e
-->/dev/da23s1e
-->/dev/da22s1e
-->/dev/da21s1e
-->/dev/da20s1e
-->/dev/da19s1e
-->/dev/da18s1e
-->/dev/da17s1e
-->/dev/da16s1e
-->/dev/da15s1e
-->/dev/da14s1e
-->/dev/da13s1e
-->/dev/da12s1e
-->/dev/da11s1e
-->/dev/da10s1e
-->/dev/da9s1e
-->/dev/da8s1e
-->/dev/da7s1e
-->/dev/da6s1e
-->/dev/da5s1e
-->/dev/da4s1e
-->/dev/da3s1e
-->/dev/da2s1e
-->/dev/da1s1e
machdep.isilon_hw_monitor: 1046271 -> 1046271
mv: rename /ifs/.ifsvar/modules/nfs/nfs_default_upgrade-securty-1.xml to /ifs/.ifsvar/modules/nfs/nfs_default.xml: No such file or directory
mv: /ifs/.ifsvar/modules/nfs/exports.1: set times: No such file or directory
mkdir: /ifs/.ifsvar/etc/mcp: File exists
mkdir: /ifs/.ifsvar/tmp: File exists
mkdir: /ifs/.ifsvar/db: File exists
mkdir: /ifs/.ifsvar/db/pkg: File exists
mkdir: /ifs/.ifsvar/db/celog: File exists
Running isi firmware status --save
Isilon OneFS/amd64 (securty-1) (ttyd0)
login: /输入账号,登录系统
到此初始化完全配置完成。
三、配置SMB(CIFS)
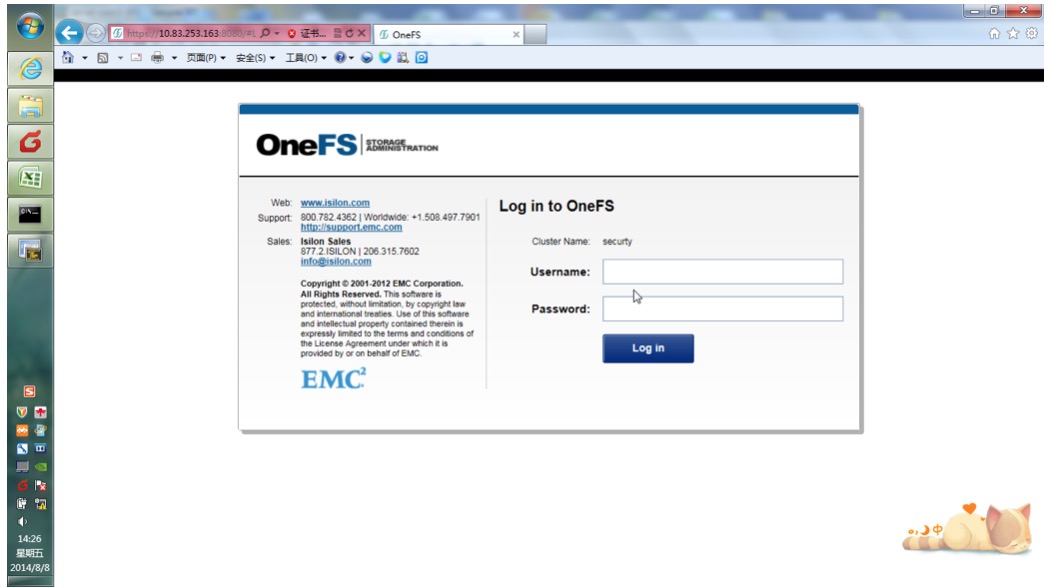
3.1登陆WEB管理界面
网线一端连接到节点所连接的网络交换机上,一端连接电脑,本机的IP和isilon节点的IP在同一网段。登陆任一节点的IP,例如:http:// 10.83.254.163。
如果配置了SmartConnect,访问SmartConnect IP。
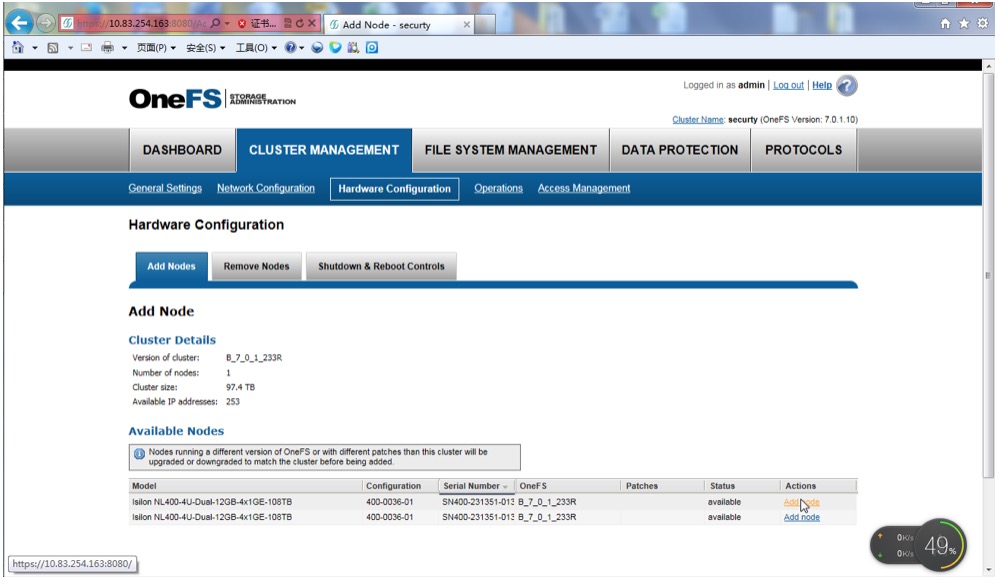
3.2 加入节点
1. 在WEB管理界面下添加节点
2.命令行模式添加节点
Please select an option.
Node build: Isilon OneFS v7.0.1.10 B_7_0_1_233(RELEASE)
Node serial number: SN400-231351-0134
Select an option:
[ 1] Create a new cluster
[ 2] Join an existing cluster
[ 3] Exit wizard and configure manually
[ 4] Reboot into SmartLock Compliance mode
Wizard >>> 2
3.3 创建目录
1.首先要创建需要共享的目录:选择File System management->File System Export
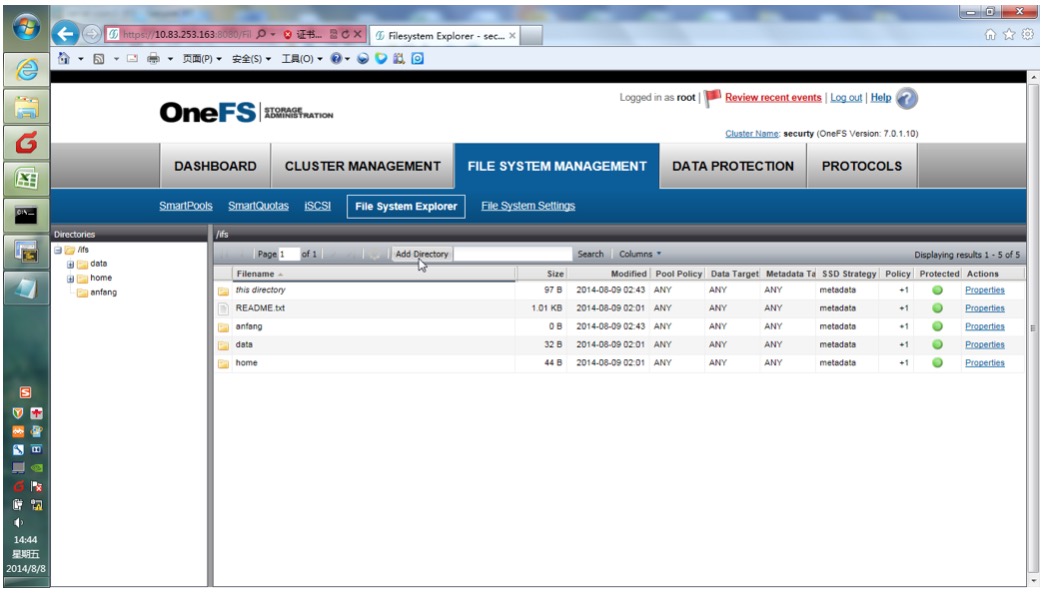
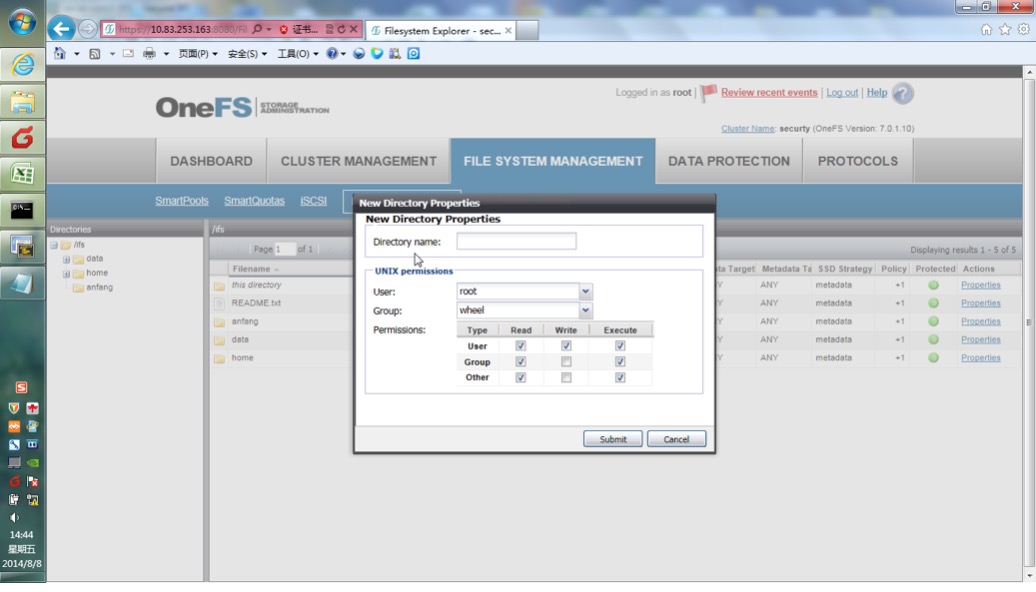
2. 点击Add Directory并且填入目录的名字:
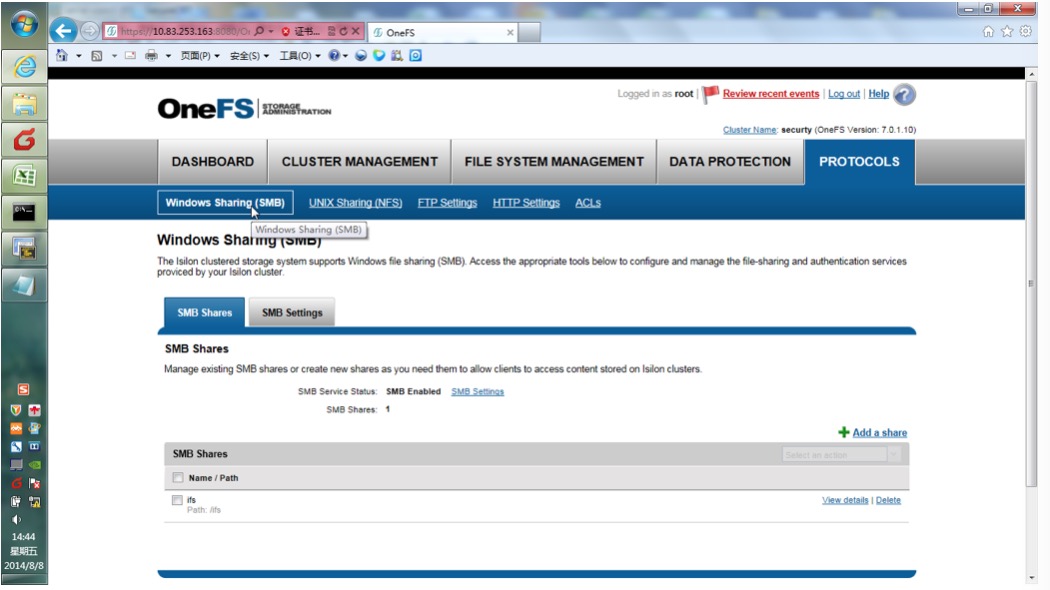
3.4 添加共享
选择protocols->windows sharing(SMB)->Add a share
输入shear 名称
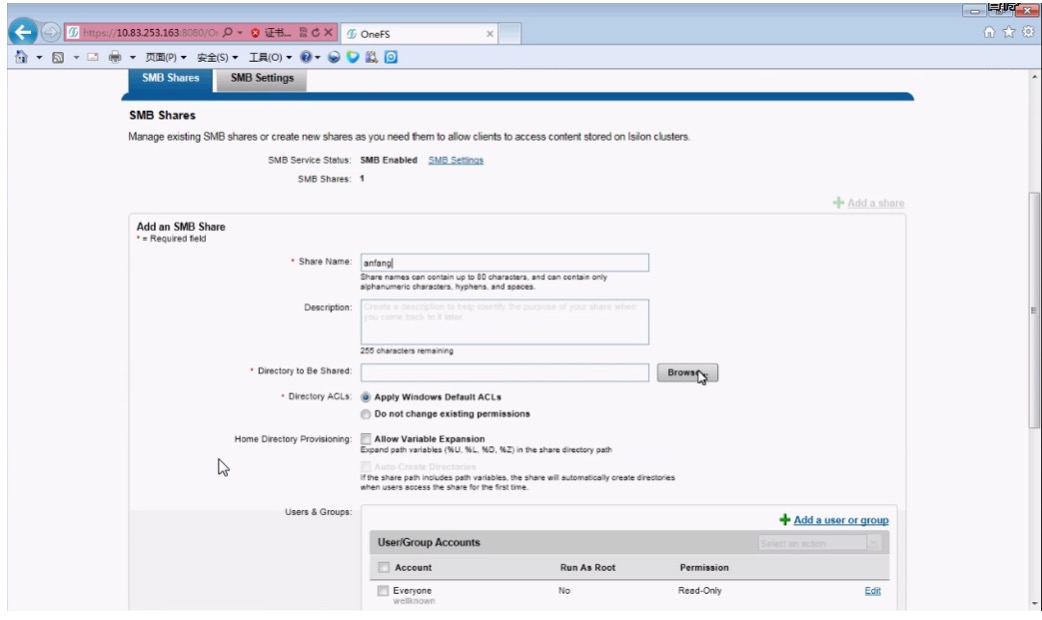
选择目录

编辑用户权限,也可以自己创建一个新的用户。
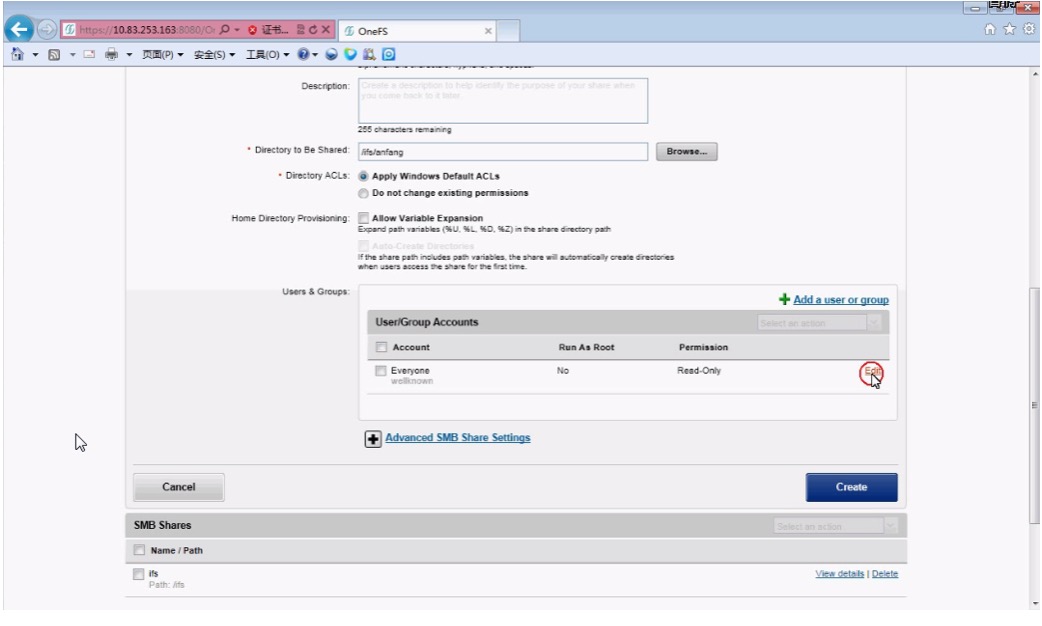
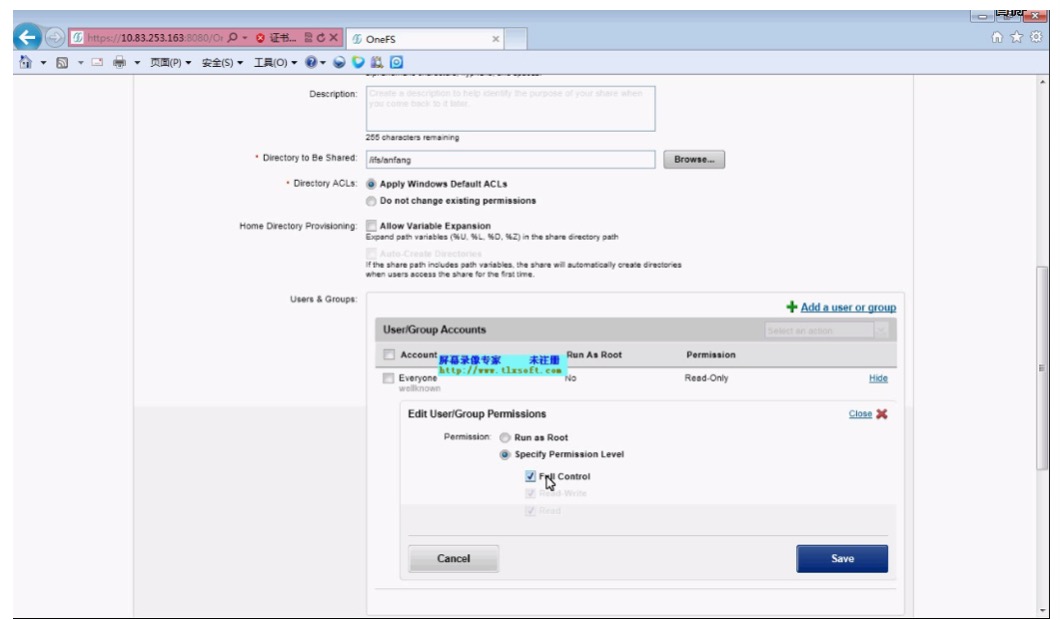
点击save 保存配置。
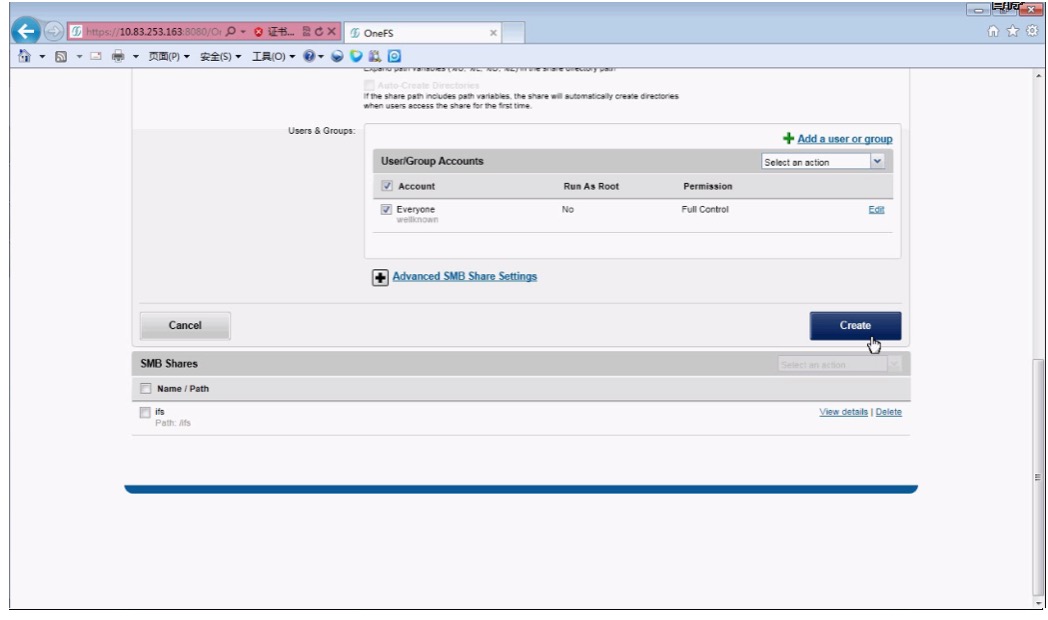
单击creat 创建share。

到此isilon配置完成。
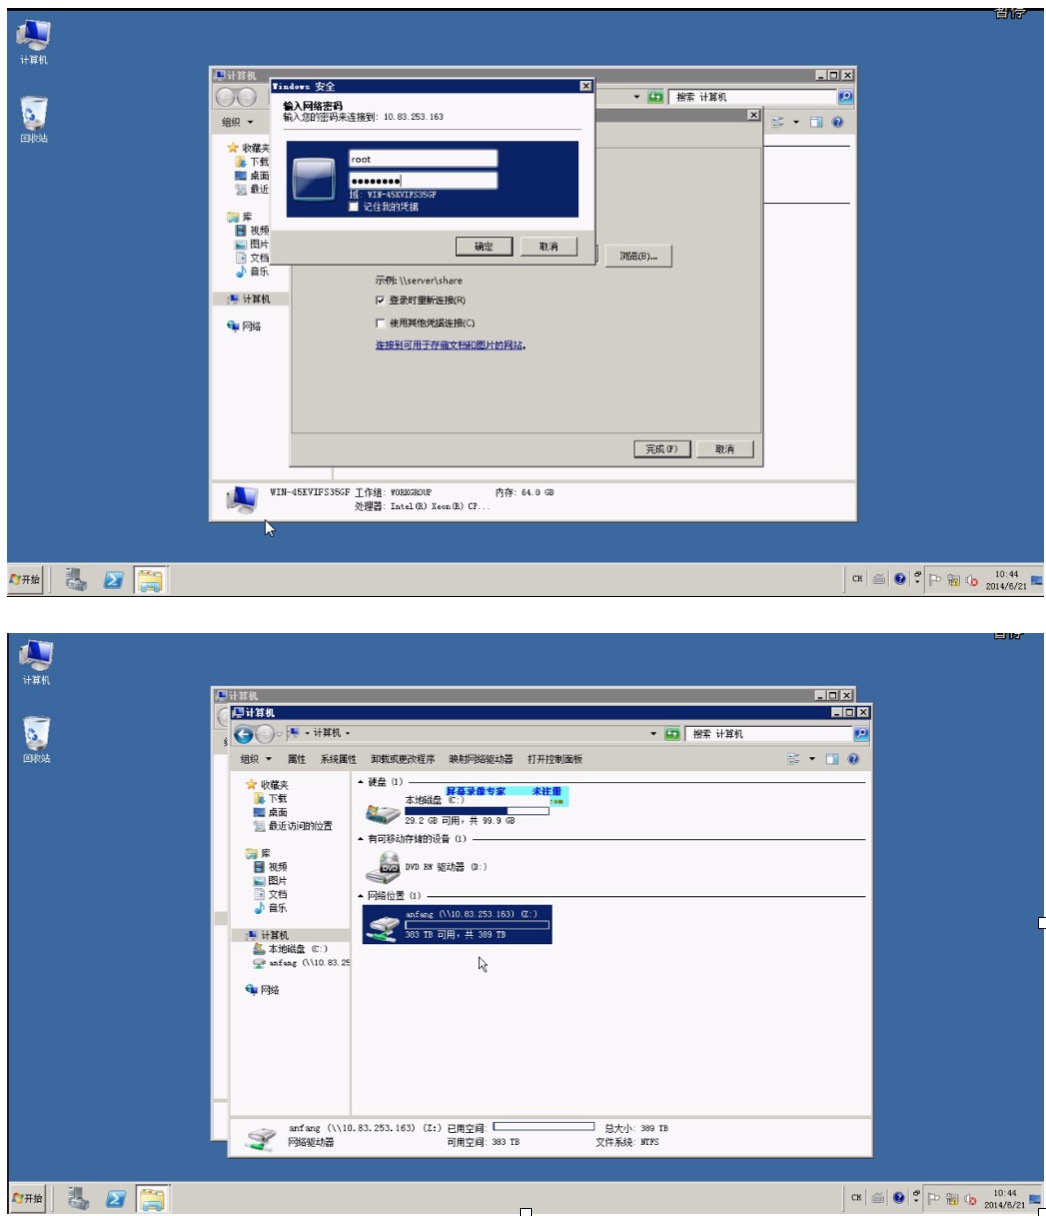
四、服务器挂载共享目录
1 在服务器端选择映射网络驱动器
2 添加路径
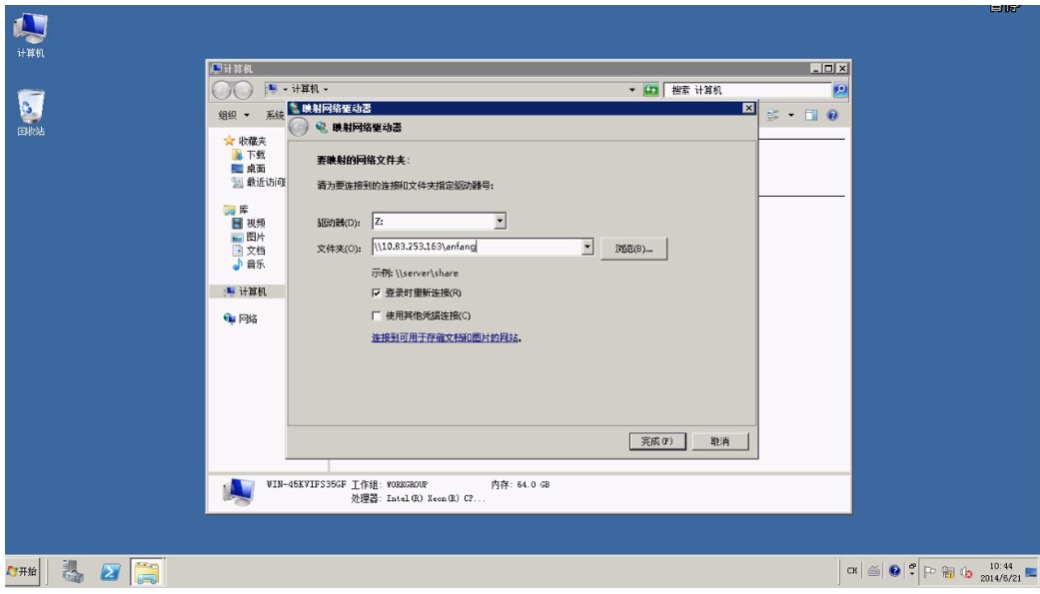
3 输入isilon登陆账号
五 isilon维护
5.1 查看isilon状态
securty-1# isi status
查看各节点磁盘状态
securty-1# isi devices -a status -d 1(1表示节点1)
5.2关闭、重启节点或集群
1.串口登陆
注:输入关机命令前,先输入isi config
2.WEB界面管理
网线一端连接到节点所连接的网络交换机上,一端连接电脑,本机的IP和isilon节点的IP在同一网段。登陆任一节点的IP,例如:http:// 10.83.254.163。
请在webui界面进入CLUSTER MANAGEMENT > Hardware Configuration > Shutdown & Reboot Controls.
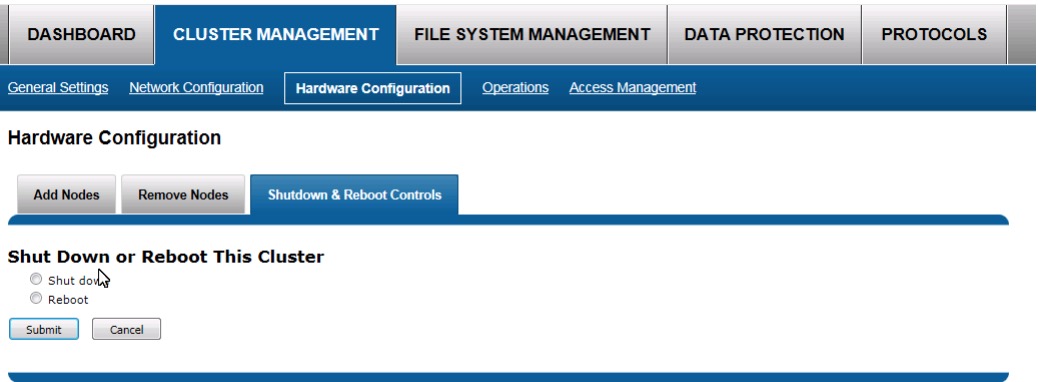
注:如果不按照正常步骤关机,可能造成丢失journal(该文件在断电情况下只保存3天,正常关机该文件会写入到磁盘中)文件,致使系统无法正常启用,只能回复出厂设置,造成数据丢失。
5.3 重新初始化isilon
重新初始化Isilon 节点的步骤如下(请知悉:以下步骤会造成所有数据及配置文件丢失):
1.将所有节点的IB(isilon内部节点级联线)线从节点上移除。
2.在节点1开机界面时选择1 进入命令行模式
Command Options:
1) Enter recovery shell
2) Continue booting
3) Reboot
3.输入命令# isi_reformat_node
4.在子项中输入 yes 并回车
Reformatting node and destroying filesystem
Are you sure? (yes/no) [no]?
This could destroy data
Are you really sure? (yes/no) [no]?
5.此时节点会重新初始化,完成之后会自动重启,需要半小时左右,请耐心等待。
6.重启完成之后,暂时不要继续在此节点操作。
7.对剩余的其它节点执行步骤2#~6#。
8.所有节点完成初始化之后,将IB线重新插上。
9.在节点一新建集群并配置。
10.将剩下的其它节点加入刚刚新建的集群。
5.4 收集日志
securty-1# isi_gather_info
收集完成后到对应目录下到处次日志。
securty-1# isi_ovt_check
该命令大概需要30分钟。

关注我们: